Role-Based Authorization: A Developer’s Mental Model
Originally published on Medium on June 11, 2026.
From “who are you?” to “what are you allowed to do?”
The problem this solves
Imagine building a web application where every logged-in user initially has the same access. As the product grows, requirements change:
- Administrators should manage users.
- Editors should publish posts without being able to delete accounts.
- Regular users should read content and update only their own data.
You could scatter checks such as if (user.role === 'admin') throughout the codebase, but keeping those checks consistent quickly becomes difficult. Role-based access control (RBAC) provides a structured alternative.
What is role-based authorization?
RBAC assigns permissions to roles and roles to users. Instead of encoding exceptions for individual users, the application checks whether a user’s role grants the permission required for an action.
Think of badges in an organization: different roles carry different responsibilities and access rights. Resource-specific restrictions may still apply, but the role establishes a set of permitted actions.
Authentication vs. authorization
Authentication establishes who is making a request. Authorization determines what that identity is allowed to do.
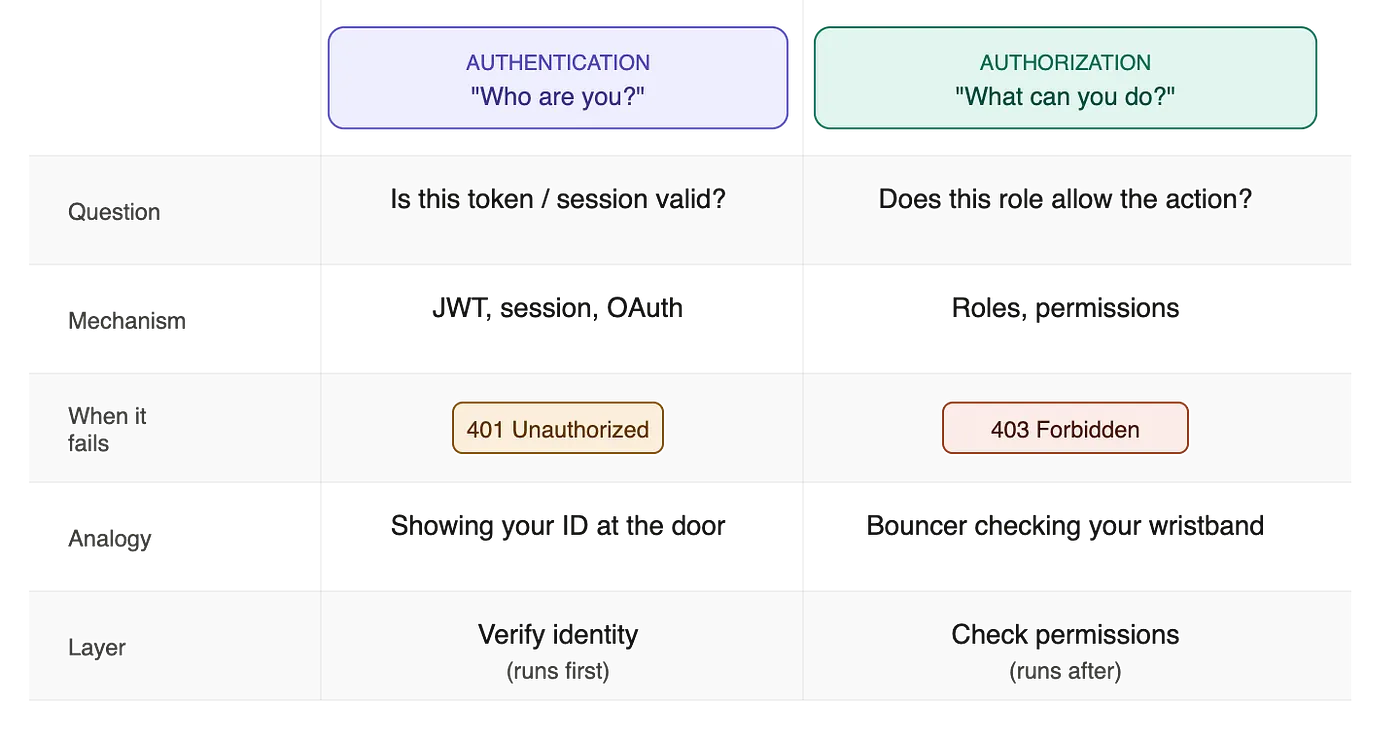
For the protected routes in this example, authentication runs before authorization so the permission check has a verified user identity to inspect.
Build it in Node.js and Express
The implementation has three parts: a permission map, reusable authorization middleware, and protected routes. Token creation and authentication middleware are outside the scope of these snippets.
1. Create a permission map
Define the actions your application recognizes, then assign those permissions to roles:
export type Permission =
  | "users:create"
  | "users:read:all"
  | "users:read:own-data"
  | "users:update"
  | "users:update:own-data"
  | "users:delete"
  | "users:delete:own-data"
  | "habits:create"
  | "habits:read:all"
  | "habits:read:own-data"
  | "habits:update"
  | "habits:update:own-data"
  | "habits:delete"
  | "habits:delete:own-data"
  | "tags:create"
  | "tags:read"
  | "tags:update"
  | "tags:delete";

type Role = (typeof userRoleEnum.enumValues)[number];

export const rolePermissions: Record<Role, Permission[]> = {
  user: [
    "users:create",
    "users:read:own-data",
    "users:update:own-data",
    "users:delete:own-data",
    "habits:create",
    "habits:read:own-data",
    "habits:update:own-data",
    "habits:delete:own-data",
  ],
  admin: [
    "users:create",
    "users:read:all",
    "users:read:own-data",
    "users:update",
    "users:update:own-data",
    "users:delete",
    "users:delete:own-data",
    "habits:create",
    "habits:read:all",
    "habits:read:own-data",
    "habits:update",
    "habits:update:own-data",
    "habits:delete",
    "habits:delete:own-data",
    "tags:create",
    "tags:read",
    "tags:update",
    "tags:delete",
  ],
};
userRoleEnum comes from the application’s existing role definition. The permission names describe capabilities; naming one own-data does not itself enforce ownership.
2. Check the permission in middleware
The authorization middleware answers whether the authenticated user’s role grants a required permission:
const validatePermissions = (requiredPermission: Permission) => {
  return (req: AuthenticatedRequest, res: Response, next: NextFunction) => {
    const userRole = req.user!.role;

    if (!hasPermission(userRole, requiredPermission)) {
      return res.status(403).json({ error: "Forbidden: Unauthorized" });
    }

    next();
  };
};
validatePermissions("users:read:all") is a factory call: it returns middleware configured with one required permission. Routes can reuse the same logic with different permissions.
The snippet assumes that authentication has populated req.user and that the application’s hasPermission helper checks the centralized permission map. Those definitions are not included in the original example.
3. Protect the routes
The middleware chain runs in order: authenticate, validate the request, then check the required permission before invoking the handler.
router.use(authenticateToken);

router.get(
  "/:id",
  validateParams(userIdSchema),
  validatePermissions("users:read:own-data"),
  getProfile,
);

router.post(
  "/",
  validateBody(insertUserSchema),
  validatePermissions("users:create"),
  createUser,
);

router.put(
  "/:id",
  validateParams(userIdSchema),
  validateBody(updateUserSchema),
  validatePermissions("users:update:own-data"),
  updateProfile,
);
These are role-level checks. The routes targeting /:id also need an ownership check or appropriately scoped database access to ensure that the requested record belongs to the authenticated user. Parameter validation alone does not establish ownership.
Frontend visibility vs. backend protection
Hiding a button can make the interface clearer, but it does not protect an API. A user can send requests independently of the frontend.
For example, hiding a delete button is insufficient if the corresponding DELETE /users/:id endpoint does not enforce authorization. Always validate access on the backend.
The danger of scattered authorization checks
A role check starts in one handler, gets copied into a service, and then appears in several utilities. Over time, no single place describes who can do what.
Duplication
Every copied check becomes another place to update when requirements change. Adding a moderator role should not require searching the entire codebase for hard-coded administrator checks.
Scattered checks:
  routes/userRoutes.ts  → user.role === 'admin'
  routes/habitRoutes.ts → user.role === 'admin'
  routes/tagsRoutes.ts  → user.role !== 'admin'

Centralized permissions:
  user      → assigned permissions
  moderator → assigned permissions
  admin     → assigned permissions
With a central permission map, routes continue asking for capabilities while role assignments can evolve in one place.
Poor visibility
Explicit permission middleware makes route requirements easier to inspect. When checks are buried inside unrelated handlers and utilities, auditing an endpoint requires following many code paths.
Keep authorization rules consistent
Use centralized rules and reusable guards to make authorization visible at application boundaries. Controllers can then focus on handling requests and coordinating business logic.
Resource-level authorization may also need to run where the relevant data is available. Services reached through background jobs or other entry points should not assume that Express middleware has always run. Reuse the policy rather than duplicating role checks.
When RBAC is not enough
Two common requirements need more than a role check:
- Ownership: A user may edit their own habits, but not another user’s. Check the relationship between the authenticated identity and the target record.
- Context-dependent access: Roles such as
admin_but_cant_deleteoreditor_with_billing_accesscan signal a need for a more flexible permission or attribute-based model.
In this project, role checks were combined with ownership-level authorization. PostgreSQL row-level security provided an additional layer of enforcement for database roles subject to those policies.
Apply the model
Start with the actions your application supports. Group those permissions into roles, enforce them consistently, and add ownership or contextual checks where needed.
The useful distinction is simple: authentication identifies the caller; authorization decides whether that caller may perform this action on this resource.